Kearbey Dental Group "Time" TV Commercial

Here is my latest TV commercial for Kearbey Dental Group in Oroville, CA. Read below for some productions notes.

This was a really fun project to produce. Dr. Ryan Kearbey wanted to do something to show "the why" of the work. Why is technology and advancement important in his office. We discussed how most people (I think all people) would rather be doing something other than sitting in the dentist's chair! It's all about getting people back to doing the things they love.

We had a lot of fun during the shoot as well. Filming over the river with the quadcopter was a blast, and flying without any GPS stability in the old train tunnel along the Feather River in Oroville was a bit of a challenge...but worth it! I think the biggest challenge to any video production is the use of animals and kids...and we got that in the commercial too!

Everything was filmed in Oroville, CA. Along the Feather River, Riverbed Park, Bedrock Park and Centennial Park. Such beautiful scenery in the early fall.

Enjoy!

Filmmaker Prep - Camera Builds

My first RED ONE Build for Tri Counties Bank "We Are You" in 2008.

My first RED ONE Build for Tri Counties Bank "We Are You" in 2008.

The "camera build". What in the world is that? It's a critical routine in being well prepared for a shoot, especially if you are using anything that deviates from your standard kit. In this post I will give some details about this important (and often overlooked) step in getting ready for a shoot.  

I was recently talking with a fellow filmmaker over coffee and we were discussing the importance of good habits when it comes to preparing for shoots. We were discussing an old blog post of mine about how preparation for a shoot often begins at the last shoot. This idea is nothing new. In recording studios you always "normalize" the studio or the board after a session to ensure everything is back to how it started. I believe we should always take the time to do that as we pack up at the end of shoots. For example, regardless of what color temperature bulbs I use in my Kino Flos during a shoot, I always normalize them back to K55 bulbs before they are packed. This ensures that when I take them out on the next shoot, I know what to expect.

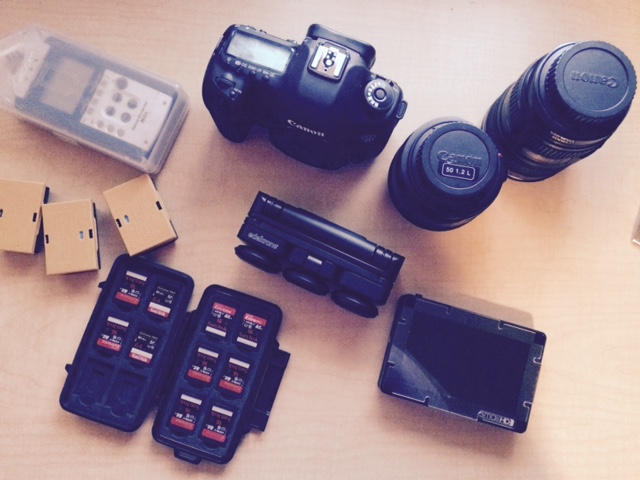
When it comes to camera gear these days, rarely are we taking out a nice, simple, self-contained video camera. The modern digital cine camera has a myriad of accessories, rods, matte boxes, interchangeable lenses, viewfinders, monitors, and a host of other peripherals that we can keep adding. The list can get exhaustive. Even more exhaustive can be keeping track of all this gear - especially if we don't use every item at every shoot. This is where the camera build comes in.

My first camera build.

I remember the first time I walked into a "proper" rental house. I was picking up a RED ONE for a commercial shoot back in 2008. I had never used a RED or rented anything from a rental company before. When I walked in I was in gear heaven! Floor-to-ceiling shelves full of Pelican brand cases, cabinets with lenses, drawers full of filters - it was impressive. In the front was a large open area where the outgoing gear was organized. I found the row of cases with my name on them. The owner of the rental shop came up and went over what was there and said after we build up the camera we could evaluate if anything else needed to be added to the rental list. Build up the camera? This was a different world than my old "everything is ready to go, let's shoot" life I had been living.

We built up the camera, which means that we set everything up like we were going to film right then and there. We attached the baseplate and dovetail for the tripod, rods, matte box. The external battery system and all of it's cabling, checked the hard-drives and made sure all was working properly. In that moment I realized that this was such an essential process. After building the camera and ensuring that everything worked for our needs, we meticulously packed everything into the cases. Now, we KNEW we had everything we needed for the shoot.

Confidence. Piece-of-mind. Total preparedness. These are just some of things we accomplished in those 30 minutes.

Building as part of your preparation routine.

A lightweight Samsung 4K build for corporate documentary.

A lightweight Samsung 4K build for corporate documentary.

Whether you are using a DSLR, a Canon C300 or something more extensive like a RED or Alexa, the camera build should be a staple in your preparation. Nothing will let you know if you need to pick up an accessory, a different cable, or an additional articulating arm like actually building up your camera in the setup you intend to shoot with. It's a quick and simple process, yet it can save you so many headaches on the day of the shoot.

The process is pretty straightforward. Set up your support and put the rig together! It seems simple because it is. For me this usually takes 15 minutes and I am confident when it is packed away that everything I need will be present and accounted for when I open up the case on location. 

I have found faulty cabling, dead batteries, missing filters, rods that aren't long enough for my lens choice - you name it. I am able to solve these problems or find alternatives in prep as opposed during the shoot - saving me precious time and keeping me professional in front of the client.

Conclusion

If you're not currently building up your camera prior to shoots, I encourage you to do so. It's the cheapest insurance you can get for knowing your camera setup will be ready to go. It also works well for grip, lighting and audio gear. Recording audio with on-camera talent? Take the time to setup your shotgun (or wireless), boom and recorder to make sure everything is in working order ahead of time. This process can be applied to any area of your gear and equipment.

A small investment in time can (and will) reward you with confidence and piece of mind.


Preparing For the Next Day - A filmmaker's quick thoughts on shoot prep.

Be Prepared.

The Boy Scout motto is "Be Prepared". I'm not a Boy Scout, but I did go to a few meetings as a kid. As a filmmaker, I find myself on early morning shoots more often than my body would like. It's currently 11 p.m. on Sunday and I have a commercial shoot at 8:30 a.m. Not too early, but early enough that now is the time to make sure everything is prepped.

Typically, I like to keep my work hours as traditional as possible. Work 8-5, Monday through Friday. However, this past weekend involved moving office furniture, a quick out-of-town birthday trip, and Father's Day. So here we are, Sunday night prep!

I could easily wake up early to get prepared --and I will -- but there's a few quick things I can do tonight to make tomorrow morning easier, and help me sleep better tonight.

Prep Starts During the Last Shoot.

I'm a firm believer in having solid systems in place. For example, I always pack my camera and gear cases the exact same way before and after a shoot. A quick glance of my camera case tells me that everything is in it's place and I don't have to worry about anything missing. During the last commercial shoot, my assistant kept spent batteries charged, ensured that every piece of lighting and grip gear was packed away carefully and everything was in it's place. 

Having a good system for how and wear each item is stored makes prep quick and reliable. My camera prep before a shoot involves a quick inventory of the camera case, and charging one or two batteries that were being used at the end of the last shoot. I double check my case full of memory cards to ensure that all are formatted and we are ready to go.

Since it's Father's Day for another hour, I will say that my dad was a firm believer in always putting things in their place. That way you would always know where they were when you needed them. I have adopted this with my camera case, as well as the storage of my lighting and grip gear.

Plan the shoot. Shoot the plan.

One of the things I like to do right before a shoot (whether that is the night before, or morning of) is to review my shoot plan. Beyond having a solid script or treatment prior to filming, I typically come up with a shoot schedule and plan. This may be some simple notes on a short commercial script, or something far more detailed. The goal is to arrive at the shoot with clear ideas of how the day will go.

Often I am shooting some rather simple 30 second TV ads for local businesses, but the process remains. Plan the shoot, then shoot the plan. I always leave the options open to get creative and seize an opportunity for an unplanned shot or simply capturing the moment, but as a professional I am expected to deliver a quality product and that means always having a solid foundation to work from. One of the things I do prior to a shoot is review scripts, review shot-lists and any schedules, plans, directions or other information that will need to be fresh in my mind for the next day.

Check the weather.

IMG_3745.PNG

One of the final things I do before a shoot is a quick check of the weather. If the shoot is outside this can make or break a shoot. If it's indoors, it still matters. Sometimes we are using window light and the weather can affect that. Or, if we are recording sound and it's pouring rain we have to consider how that will impact our ability to get good audio. If it's super hot, I may simply bring a change of clothes if we have to load out gear in 100+ degree heat. Weather matters.

Water. Quiet. Sleep.

The most important thing I do the night before a shoot is to make sure I get good sleep. That means being well hydrated, having some quiet time to wind-down, and getting a good night's rest. The best thing you can do for your work is to arrive rested, alert and fully prepared to give it your all. 

I'll still be getting up early to pack for the shoot and give myself plenty of time to arrive early. But these simple, and relatively easy things have me a few steps ahead of the game.

Goodnight.


Movi M5 Review for VideoMaker

The Movi M5 by Freely Systems

The Movi M5 by Freely Systems

In the summer of 2014 I had the chance to review the Movi M5 for the nice folks over at VideoMaker magazine.  The Movi M5 is a gimbal stabilized camera support that offers completely smooth handheld camera shot. Unlike the industry standard Steadicam, the Movi stabilizers are lightweight and much easier to use. Read the article here.


The best way to review a product is to USE it. The timing with the Movi M5 worked out great because I was just going into production on a short film written and directed by my cousin, Adam Chollet for which I was the DP as well as the editor. This film has a great chase sequence that was shot entirely on the Movi M5. You can watch it below.

Movi M5 on set of "The Find"

Movi M5 on set of "The Find"


Another opportunity to use the Movi came about on a commercial project for Black Bear Diner. The Movi M5 was used as the exclusive camera support for this "Spelunking Bear" TV ad.

Calguns Foundation - 3D Identity Design

I love motion graphic design. I spend countless hours in Adobe After Effects learning and creating. When VideoCopilot came out with Element 3D...I was hooked.

A while ago I was contacted by the Calguns Foundation in Sacramento, CA for some assistance building an identity piece for their web video content. They needed a branding piece that would lead into their short web videos that they create on a regular basis. This had to be impactful and as they requested "really cool looking".

After some discussion I suggested we build their logo in 3D and make it look like a large structure that is being revealed. After some hard work and lots of caffeine, this was the outcome:

The client is really happy with the result...as was I.

This is a perfect example of great creative telling a bigger story. After some work identifying the brand archetype that best represents the Calguns Foundation (they are a hero / defender), it was much easier to make creative decisions that would not only deliver an identity, but help to build their brand. From the lighting, to the music and sound design choices, everything is intentional and supports their brand story.


Building the Logo in 3D

The images below showcase a few steps in the process of taking an existing logo from the client and building a 3D animated piece. A great thing to consider when having a logo designed is if the designer can build it out for use in other mediums (like being converted to 3D). A lot of designers only work in print, and this creates a lot of work when it needs to be translated into 3D.

The steps it took to get this logo from Adobe Illustrator into Adobe After Effects in a 3D friendly format were extensive. My experience with Adobe and their cross-product compatibility really comes in handy on projects like this. It took some work to rebuild the logo, but it certainly paid off!

The original logo as supplied by the client in Adobe Illustrator.

The original logo as supplied by the client in Adobe Illustrator.

The logo now in After Effects, broken down into 3D friendly components.

The logo now in After Effects, broken down into 3D friendly components.

Extruding the individual objects and adding surfaces and textures. 

Extruding the individual objects and adding surfaces and textures. 

Wireframe version of the logo, showing relationships and conflicts between elements.

Wireframe version of the logo, showing relationships and conflicts between elements.

Composite version of the 3D logo. Ready for animation.

Composite version of the 3D logo. Ready for animation.

Adding camera moves, lighting, and depth-of-field to give the logo mass and realism.

Adding camera moves, lighting, and depth-of-field to give the logo mass and realism.

The final logo, as it appears at the end of the video.

The final logo, as it appears at the end of the video.